
Every summer on Kos, the zucchini plants in my family’s garden behaved the same way: modest through June, generous in July, and by August, frankly overwhelming. My mother had a phrase for it in Greek — the giving. She handled it the same way every year. She made kolokythopita.
Kolokythopita is a traditional Greek zucchini and feta pie wrapped in crisp, golden phyllo — the kind of dish that feeds a whole family from a single pan and tastes just as good at room temperature as it does straight from the oven. It has always sat in the shadow of its more famous cousin, spanakopita, and that is a shame. The flavors are lighter and more summery, the filling softer, with dill and fresh mint forward in every bite.
But kolokythopita has a challenge that spanakopita does not: moisture. Zucchini holds far more water than spinach. If you do not address that water before the filling ever meets the phyllo, the pie will be limp, wet, and collapsing before it finishes baking. This recipe gives you five specific techniques for managing moisture. Get them right and you will pull a pan of burnished, crackling phyllo from the oven.
Table of Contents
What Is Kolokythopita?
Kolokythopita (κολοκυθόπιτα) is a traditional Greek savory pie made with grated zucchini, crumbled feta cheese, eggs, and fresh herbs — most commonly dill, and often mint — enclosed in layers of paper-thin phyllo dough and baked until golden. The name joins kolokythi, the Greek word for zucchini or squash, with pita, meaning pie.
It belongs to the wide family of Greek phyllo pies that are foundational to the home table across the country and across the islands. Spanakopita (spinach pie), hortopita (wild greens pie), and tyropita (cheese pie) are its nearest relatives. Each follows the same structure — phyllo, filling, phyllo — but kolokythopita demands the most careful water management of all of them.
In the Dodecanese islands where I grew up, kolokythopita was a summer staple. It was baked in a large rectangular pan and cut into generous squares, eaten as a main course with a block of feta and torn bread, or served in smaller pieces as a meze alongside olives and good wine. It is fully vegetarian, filling without being heavy, and built on the unmistakable combination of olive oil and fresh herbs that defines Greek cooking at its best.
Feta, the key ingredient in the filling, is a protected designation of origin (PDO) cheese. Authentic Greek feta is made from sheep’s milk or a blend of sheep’s and goat’s milk and has been produced in specific Greek regions for centuries. For kolokythopita, use a proper block feta packed in brine — not pre-crumbled.
Why This Recipe Works
- Salting and squeezing the zucchini removes the moisture that would otherwise destroy the phyllo. Grated zucchini is salted generously, rested for 30 minutes, then squeezed hard in a clean kitchen towel. This step is non-negotiable. Skip this and no amount of good phyllo technique will save you.
- Coarsely crumbled block feta rather than fine or pre-crumbled. Feta bought in a block and torn or crumbled by hand creates irregular pockets in the filling that melt differently. Pre-crumbled feta can be drier and milder, which flattens the flavor of the finished pie.
- Olive oil on every phyllo sheet, not butter. Greek phyllo pies are brushed with olive oil, not clarified butter. The distinction matters: olive oil gives the phyllo a savory, slightly fruity character that complements the zucchini and dill.
- Scoring the top before baking releases steam. Cutting through the top phyllo layers in the pattern you plan to serve allows steam to escape during baking and makes clean cutting much easier once the pie is baked.
- Resting before cutting allows the egg-bound filling to firm. Fifteen minutes of patience produces clean, neat portions that stay together on the plate.
Ingredients
For the Filling:
- 1.5 kg (3.3 lbs / approximately 4 medium) zucchini, coarsely grated
- 1 tsp fine sea salt (for drawing moisture)
- 400 g (14 oz) feta cheese, crumbled coarsely from a block in brine
- 4 large eggs, lightly beaten
- 1 medium onion, finely grated or minced
- 3 tbsp fresh dill, finely chopped (not dried)
- 2 tbsp fresh mint leaves, finely chopped (optional but recommended)
- ½ tsp freshly ground black pepper
- Small pinch of ground nutmeg
For the Phyllo Layers:
- 500 g (1.1 lb / approximately 24 sheets) phyllo dough, thawed overnight in the refrigerator
- 120 ml (½ cup) extra virgin olive oil, for brushing
Step-by-Step Instructions
Step 1 — Draw the water from the zucchini.
Coarsely grate the zucchini on the large holes of a box grater. Place in a large mixing bowl, add 1 teaspoon of fine sea salt, and toss thoroughly to coat. Set aside uncovered for at least 30 minutes.
After 30 minutes, transfer the zucchini in batches to a clean kitchen towel. Gather the four corners, twist, and squeeze hard over the sink — harder than you think you need to. Keep squeezing until no more liquid runs freely. The zucchini should feel nearly dry in your hands. A properly squeezed batch loses between 150 and 200 ml of water.
Step 2 — Make the filling.
In a large bowl, combine the squeezed zucchini, crumbled feta, beaten eggs, onion, dill, mint if using, black pepper, and nutmeg. Mix well until cohesive. Taste for salt before adding any — feta carries significant salt and the zucchini was salted as well.
Step 3 — Prepare the pan.
Preheat the oven to 180°C / 350°F fan-forced (or 190°C / 375°F conventional). Brush a 33 x 23 cm (13 x 9 inch) baking pan with olive oil. Remove the phyllo from the package and cover immediately with a clean, slightly damp kitchen towel. Keep it there throughout the assembly. Phyllo dries out in minutes.
Step 4 — Layer the phyllo base.
Lift one sheet of phyllo from the stack, lay it in the prepared pan, and allow the edges to drape up the sides. Brush the surface lightly with olive oil. Repeat with 8 to 10 sheets total, brushing each layer and slightly varying the angle of each sheet so the overhanging edges cover all four sides of the pan.
Step 5 — Add the filling and close the pie.
Spread the zucchini-feta filling evenly over the phyllo base. Press lightly with a spatula to eliminate air pockets. Fold the overhanging phyllo edges in over the filling, brushing each fold with olive oil as you go. Lay the remaining sheets of phyllo over the top one at a time, brushing each with olive oil. Tuck the edges down into the sides of the pan and brush the entire top surface generously.
Step 6 — Score and bake.
Before placing in the oven, use a sharp knife to score the top through the upper phyllo layers only — do not cut all the way to the filling. Score in the pattern you plan to cut: a 4 x 2 grid for 8 generous squares. Bake at 180°C / 350°F for 45 to 55 minutes, until the top is deep golden brown and the edges are visibly crisp. Rotate the pan at 30 minutes if your oven runs unevenly.
Step 7 — Rest and serve.
Remove from the oven and leave the pan uncovered on a rack for at least 15 minutes before cutting. Cut along the scored lines using a sharp knife. Kolokythopita is excellent warm but also very good at room temperature. This pie pairs well with a simple Greek Village Salad (Horiatiki) alongside.
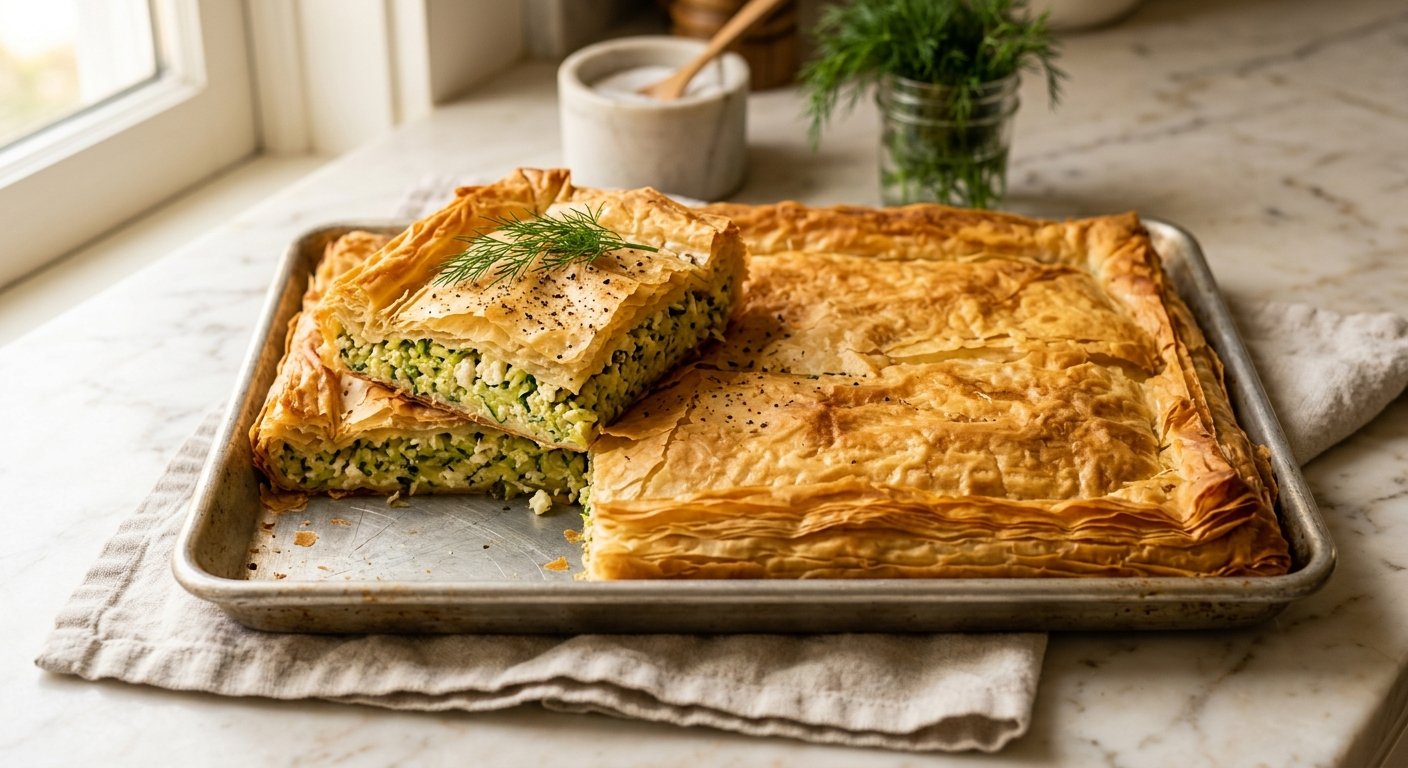
Kolokythopita (Greek Zucchini and Feta Pie)
Ingredients
For the Filling
- 1.5 kg zucchini about 3.3 lbs / 4 medium, coarsely grated
- 1 tsp fine sea salt for drawing out moisture
- 400 g feta cheese 14 oz, crumbled coarsely from a block in brine
- 4 large eggs lightly beaten
- 1 medium onion finely grated or minced
- 3 tbsp fresh dill finely chopped, not dried
- 2 tbsp fresh mint leaves finely chopped, optional but recommended
- 0.5 tsp freshly ground black pepper
- pinch ground nutmeg small pinch
For the Phyllo Layers
- 500 g phyllo dough 1.1 lb / approximately 24 sheets, thawed overnight in refrigerator
- 120 ml extra virgin olive oil 1/2 cup, for brushing
Instructions
- Coarsely grate the zucchini on the large holes of a box grater. Toss with 1 tsp fine sea salt in a large bowl. Set aside uncovered for 30 minutes.
- Transfer salted zucchini in batches to a clean kitchen towel. Squeeze firmly until no more liquid runs freely -- the zucchini should feel nearly dry in your hands.
- In a large bowl, combine squeezed zucchini, crumbled feta, beaten eggs, onion, dill, mint (if using), black pepper, and nutmeg. Mix well. Taste for salt before adding any.
- Preheat oven to 180°C / 350°F fan-forced (190°C / 375°F conventional). Brush a 33 x 23 cm (13 x 9 inch) baking pan with olive oil.
- Stack phyllo sheets and cover with a slightly damp kitchen towel. Keep covered between uses to prevent drying out.
- Lay one phyllo sheet in the pan, allowing edges to drape up the sides. Brush with olive oil. Repeat with 8 to 10 sheets total, varying the angle slightly so edges cover all four sides.
- Spread the filling evenly over the phyllo base. Press lightly with a spatula to eliminate air pockets.
- Fold the overhanging phyllo edges in over the filling, brushing each fold with olive oil as you go.
- Layer remaining phyllo sheets over the top, brushing each with olive oil. Tuck edges down into the sides of the pan.
- Using a sharp knife, score the top phyllo layers in the pattern you plan to cut -- do not cut all the way to the filling. A 4 x 2 grid gives 8 generous squares.
- Bake 45 to 55 minutes until the top is deep golden brown and the edges are visibly crisp. Rotate the pan halfway through if your oven runs unevenly.
- Rest uncovered on a rack for at least 15 minutes before cutting along the scored lines. Serve warm or at room temperature.
Notes
Nutrition
Chef’s Notes
On the herbs: Fresh dill is not optional. Dried dill is a different product entirely — its flavor is muted and dusty. If fresh dill is not available, I would rather leave it out and add more mint than substitute dried. Fresh mint is traditional in Dodecanese and island versions of kolokythopita and contributes a clean, slightly sharp note that cuts through the richness of the feta.
On the zucchini: Choose medium-sized zucchini rather than very large ones. Larger zucchini have more developed seeds, more dilute flavor, and even more water content. The coarse grate (large holes on a box grater) produces a filling with texture and structure. A fine grate gives you something closer to a paste.
On phyllo: Thaw commercial phyllo overnight in the refrigerator rather than at room temperature. Refrigerator thawing minimizes condensation forming on the sheets. If the phyllo sheets are large, trim them with scissors. A few torn edges are fine — patch them and cover with the next sheet. Dried, crumbling phyllo cannot be saved.
Connecting to other Greek pitas: The phyllo technique here is identical to what I use for Greek Spinach Pie — same brushing method, same layering approach, same scoring. The critical difference is the moisture management step. If you have made spanakopita and found it easy, kolokythopita is the same process with that one extra step added at the beginning.
Storage and make-ahead: The finished pie keeps covered at room temperature for several hours and refrigerated for up to 3 days. To freeze before baking, assemble the pie completely, wrap the pan tightly in two layers of plastic wrap, and freeze for up to 2 months. Bake directly from frozen at 180°C / 350°F for 60 to 70 minutes, covering loosely with foil for the first 30 minutes.
FAQ
What does kolokythopita mean?
Kolokythopita (κολοκυθόπιτα) translates from Greek as “zucchini pie.” Kolokythi is the Greek word for zucchini or squash; pita means pie. It belongs to the same family of phyllo-wrapped Greek savory pies as spanakopita (spinach pie) and tiropita (cheese pie).
Why is my kolokythopita soggy?
The most common cause is insufficient moisture removal from the zucchini before the filling is assembled. Salt the grated zucchini, let it rest at least 30 minutes, then squeeze it very firmly in a kitchen towel until it feels nearly dry. If you skip this step or do not squeeze thoroughly enough, the phyllo will steam rather than bake.
Can I use frozen phyllo for kolokythopita?
Yes, and most home cooks do. Thaw the phyllo overnight in the refrigerator — not at room temperature — to prevent condensation from making the sheets sticky. Keep the sheets covered under a slightly damp towel while you work. A few torn edges are fine; dried, crumbling phyllo is the real problem to avoid.
Can kolokythopita be made ahead?
Yes, in two ways. The filling can be assembled and refrigerated up to 24 hours before you build and bake the pie. Alternatively, you can assemble the entire pie, wrap it tightly, and freeze it unbaked for up to 2 months. Bake from frozen at 180°C / 350°F for 60 to 70 minutes, covering the top loosely with foil for the first 30 minutes if it browns too quickly.
What is the difference between kolokythopita and spanakopita?
Both are Greek phyllo pies with feta, eggs, and fresh herbs, and the phyllo technique is nearly identical. The critical difference is moisture management. Spinach wilts significantly but releases far less water than zucchini. Kolokythopita requires a deliberate salting and squeezing step that spanakopita does not. The flavor profiles also differ — kolokythopita is lighter, more delicate, and more summery. If you have made a classic Greek spinach pie before, kolokythopita uses the same phyllo method with that one extra step added at the start.